1.- Open Notepad++. Copy these four lines:
2.- Use the menu “File / Save” option to save your file as an .htm file (call it, for example, page1.htm),
in a folder with your name, for example D:\Datos\YOURNAME.
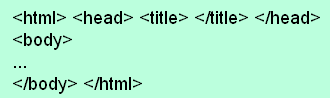
Now you have an empty web page. Here is the meaning of the codes:
<html> = beginning of the html (hypertext mark-up language) document.
<head> = beginning of the initial information (head).
<title> = beginning of the title.
</title> = end of the title.
</head> = end of the head.
<body> = beginning of the main information (body).
… = these points of ellipsis represent the information in your web page.
</body> = end of the body.
</html> = end of the html document.
3.- Open the file explorer (right-click on START, then select Explore), then open page1.htm with a
double click: it will open with your Internet browser and show a white page with three points of ellipsis (...).
4.- Write a title between the <title> code and the </title> code, for example "Example web page".
Save your document again, as in step 2.
5.- Go to the Internet browser window and click on the refresh button
 the one with the circular arrow(s)
to show the change to your document. Check that the title appears at the top of
the window and on the button at the bottom of the screen.
the one with the circular arrow(s)
to show the change to your document. Check that the title appears at the top of
the window and on the button at the bottom of the screen.
6.- Change the background color: add a colour code in the code:
<body bgcolor="#AACCFF">
The color code consists of three values for red, green and blue. For the background color
the maximum value is FF, the minimum AA (for font colors the minimum is 00).
Using high values you get light backgrounds, where dark or bright characters are easy to read.
Try different combinations until you can see the points of ellipsis clearly.
N.B.:
Don't forget to
(1) save your document and
(2) refresh the page
after you make a change to see the result.
7.- Add a picture.
Find an image on the Internet and copy it in your folder. Then replace the points of ellipsis with this
code: <img src="photo.jpg" align="left">.
Use .jpg, .jpeg or .png formats for photos, and .gif for drawings, animated images, and transparent background
images.
Replace "left" with "right" if you want your image to appear to the right of the text.
8.- Write a description of your picture in two paragraphs. Separate the paragraphs with <br><br>.
Use "there is / there are" to describe the elements (people, animals, things) in your picture;
use the present continuous to describe what the people or animals are doing.
9.- Add a link called “Back to index” to an index file before the photo code.
Use this code: <a href="index.htm">Back to index</a>.
10.- Make an index file with a link to your file:
a) Create a new .htm file (revise steps 1 and 2 if necessary). Save your file as "index.htm".
b) Revise step 9 and make a link to page1.htm (call this link “photo”). Save your file again.
c) Check that your links work in your Internet browser.
d) E-mail your two .htm files (page1.htm and index.htm) and the picture to  .
.
If you have any problems, e-mail your teacher, saying which step you are in and what your problem is.
FURTHER PRACTICE (voluntary activity)
11.- Open this document, select the whole text and copy it onto NotepadPlus. Save it as “instructions_in_10_steps.htm”.
Only the text will be copied, not the codes. Transform the document into a web page to practise:
to make the " < " character visible on the web page, use this code without the spaces:
& l t ; (l is an L, not an I).
12.- Add a link to the index, too, as in step 9.
13.- Add another link in your index to this file; call the link “webpage workshop instructions”.
14.- E-mail instructions.htm and index.htm to .
back to index
JJCC